Trellis
Trellis System
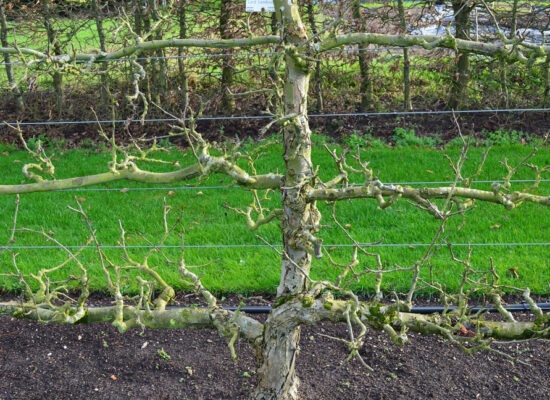
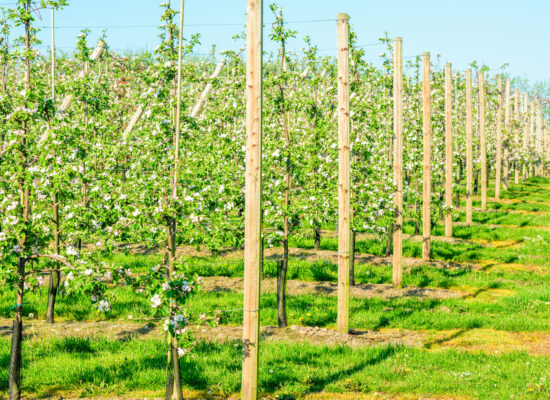
For cane support, trellis systems are employed with erect cultivars that will be allowed to grow tall before being topped, as well as trailing and semi-erect cultivars to keep the fruit off the ground. Cane placement on a trellis enhances the canopy’s airflow, sunlight penetration, and spray penetration. The planting will be simpler to handle if a trellis system is used. The attractiveness of picnic, sap, June, and Japanese beetles, which might arise from the presence of overripe and rotting fruit, is reduced as a result of easier harvesting leading to cleaner picking. Floricane removal may be facilitated by trellising. Prior to the first harvest season, trellises should be built.
Canes are supported by a variety of trellis support structures used by farmers. Your trellising objective is to reduce work and increase yield. Each trellis type has benefits and drawbacks, and the majority may be adjusted to meet your needs. To identify which trellis system best meets your needs, evaluate each one.
There are numerous varieties of trellis systems. When deciding which type to employ, take into account the following aspects: the cost of materials and construction; the accessibility of skilled, trained workers; and climate issues, such as the risk of cold harm.
Wires are placed at specific heights above the ground using line posts. Posts can be made of metal or wood. Compared to metal posts, wood line posts are more resilient to stressors like wind that blows perpendicular to the trellis. If wood posts are utilized, they must be prepared for use underground. It is beneficial to utilize a wood line post every second or third post, unless hefty metal posts are used for line posts. With 5 feet remaining above earth, drive or stake posts 2 feet into the ground. The top diameter of wood posts should be around 4 inches. Set poles no more than 25 to 30 feet apart for crops that are harvested by hand. The wire tensioning end posts should be larger than the line posts (suggest a minimum of 8 feet in length with a 6 inch top diameter to allow them to be driven 3 feet into the ground). Typically, end posts are made of wood. To further support end posts, use anchors.
The load-bearing wire on the trellis is the top wire. Use high tensile 121/2 gauge electric fence wire. The lower wires, which are used to orient the cane, don’t need to be as robust. High tensile wire with the gauge of 14 should be sufficient.
I-Trellis
A single wire or two wires spaced apart that are fastened to poles that are 2 and 4 feet above the ground make up an I-trellis. Metal or wood prepared for in-ground use can be used as posts. They ought to be placed at least two feet deep and 25 to thirty feet apart. Canes can be tucked between the two wires or loosely fastened to the wire. This trellis is simple to construct and reasonably priced. In comparison to other trellis designs, yields could be lower. The canopy may get crowded, increasing the risk of disease, making harvesting more challenging, and perhaps lowering fruit quality.
Advantages
- Economical and simple to maintain
Disadvantages
- Reduced yield
- A crowded canopy raises the risk of illness and makes harvesting more challenging.
V-Trellis (with Metal T-Posts)
The V-trellis is the most typical kind of trellis for caneberries. Steel posts that are 20 to 30 degrees off vertical are the standard for V-trellis designs.
Advantages
- Allows for more light to enter the canopy and produces more than a single post.
- There is improved airflow and less illness pressure
- Horizontal wires can be adjusted up or down using fence posts to account for a cultivar’s vigor.
Disadvantages
- More expensive than a basic I-trellis
California V-Trellis
The Gjerde method, created in Norway, was modified to create the California V-trellis. The 1-inch by 1-inch movable posts are tied nearly vertically during the winter. The floricanes’ new fruiting laterals are encouraged to spread out after the buds break in the spring.
Advantages
Fruit grows in the canopy’s outermost portions, making harvesting easier; the canopy’s light and air circulation are increased.
Disadvantages
Spray penetration is poor when the canopy is closed. It is labor-intensive and expensive. Sprayers might knock off blossoms.
T-Trellis (with Rebar)
The T-trellis is a divided canopy design in which floricanes are fastened to the trellis’s wires on one or both of its sides, allowing space for primocanes to grow erect in between the wires. The cross arms are composed of 3/8-inch rebar, while the main pillar is built of 12-inch rebar. Primocanes and floricanes are divided in the canopy, allowing more sunshine to reach the crop as it grows. The separation of primocanes and floricanes facilitates harvest and floricane clearance after harvest. For raspberries that fruit in primocane, this kind of arrangement is appropriate.
Advantages
- Because they are reusable, posts are cost-effective.
- Increased air circulation and less disease pressure.
- Easy cane removal after harvest.
- Greater light penetration into the canopy, resulting in larger yields than a single post.
Disadvantages
- Can’t be taller than 4 feet; some production potential is lost;
- May not be able to carry heavy crop loads;
- May not hold up in ice storms
T-Trellis (with Wood)
Although it is composed of wood, this trellis performs similarly to the rebar T-trellis. 8-foot posts made of pressure-treated wood or cedar should be buried two feet underground. Use pressure-treated 2-by-4-inch lumber for the crossbars. In a row, space the posts 20 to 30 feet apart.
Advantages
- Can be retrofitted from an I-trellis without the need to add additional posts
- Opens canopy for higher yields and better air circulation
Disadvantages
- Once cross arms are erected, wire height cannot be changed;
- If wires are positioned too high, fruiting zones are established that are out of reach of labor
Rotating cross arm trellises and shift trellises
The canes’ positions are altered throughout the year by both of these trellis systems. The trellis is lowered to the ground in the early spring. The canopy is raised above vertical position once the flowering shoots have started to bloom in preparation for harvest. Fruiting mostly takes place on one side of the trellis in each of these systems. Both methods necessitate meticulous primocane control.
A wooden shift trellis that swings in an arc from one side of the row to the other, it is produced.
Commercial rotating cross-arm trellises are made of plastic parts bonded with fiberglass using the pultrusion process.
A post (about 50 cm) with two plates attached at the top makes up the trellis. Detent pins are used to hold a long and a short cross-arm in place between the two plates. The two cross-arms can rotate. Two wires for cane training are inserted into the holes in the plates. The terminal arms of the trellis assembly are attached with additional trellis wires that are inserted through both cross-arms. The tie-back post made of wood is where the cables in the foreground are attached. Primocanes are positioned below the short cross-arm on the training wire.
The “Quik-End” tensioner, which has internal spring-loaded clamps, terminates the wires at the wooden tie-back post and on the end trellis assembly arms on the first and last posts of each row. The canes are pushed over to the training wire underneath the long cross-arm during the winter.
The long cross-arms of plants are horizontal when they are in blossom. Take notice of the arrow at the post’s top on the left. The flower shoots from the lateral canes that were attached to the wire on the long cross-arms have all grown upward. The upward-curving flower shoots that originate from axillary buds that are orientated down on the lateral canes will curve between the canes. The cross-arms can be adjusted upward and beyond vertical as soon as all of the flower stalks have a few open flowers. The rachis (inflorescence axis) is now woody and won’t curve upward at this point. Fruit is positioned on one side of the row by the upward rotation of the cross-arms.
Advantages
- Less fruit sunburn;
- Fruit can be covered in winter to reduce cane harm;
- Easier harvest because all the fruit is on one side of the canopy
Disadvantages
- High-priced
- More difficult to train and prune
Hints On Creating A Reliable Trellis
Here are a few advices:
- Ensure that at least 25% of the trellis posts are buried. Failures of trellises frequently result from shallow posts. Increasing that to 33 percent underground further lowers the likelihood of uprooting.
- Use 12-, 14-, or 16-foot poles, though it can be challenging to locate them. There is not enough room for an adequate underground basis with ten-foot poles. Even 12-foot posts had trouble.
- Posts with a diameter of 5 inches are 50% more robust than those with a diameter of 4 inches.
- Instead of digging, pound or vibrate end posts into the ground. In order to give enough space underground, end posts must be thicker and longer than mid-row posts that are vertical.
- Pound or vibrate anchors into the earth 4 feet below the surface while leaning them 10 degrees away from the row.
- To save area and serve as a visual cue to prevent tractor damage to the wire end, plant one or two trees between the end post and the anchor.
- Spare no expense with wire or staples. Use the strongest Class 3 galvanized staples with a 2-inch double-barbed slash end and 12.5-gauge Class 3 high tensile wire.
- Place the wires on the in-line posts’ windward side.
- Every 2 to 2.5 feet, support trees with wires.
- Consider the future and be imaginative. As producers adopt new technology and methods, trellises might offer a structure for netting, above sprinklers, or orchard sensors.
Making A Trellis
Don’t forget to give space while planting an orchard for the anchor, the most important part of a trellis. It should be as far away from the end post as the height of the post, with the end post leaning slightly in the direction of the anchor.
The most crucial component in building a trellis is the anchors.
The type of anchor used for trellis systems most frequently is an augur, or screw anchor. However, for hard soils with rocks or caliche, a rock anchor constructed of heavy rib-back steel can be pounded into the ground.
The distance between the anchor and the end pole should equal the height of the pole. The anchor shaft should face the end post’s point of attachment.
Installing screw anchors on undisturbed soil is recommended. There is a good risk that the anchor won’t hold if you drill a hole, insert the anchor, and then cover it with soil. Screw anchors have a range of lengths for their shafts. Short rows should use a three-foot shaft; regular rows should use a four-foot shaft; and longer rows or situations where the trellis is under a lot of stress should use a five-foot shaft. The shaft’s diameter can be between 5/8 and 3/4 inches.
The wire that connects the anchor to the top of the end post need to be just as sturdy as all of the trellis wires put together. Therefore, the anchor wire needs to be stronger than 4,000 pounds if, for instance, a three-wire trellis contains wires that are 12.5 gauge and have a breaking strength of 1,380 pounds apiece. It’s a typical error to use a single wire that corresponds to just one of the trellis wires to connect the anchor to the end post. Either the wire needs to be stronger, or all of the trellis wires can be extended past the end post and secured to the anchor, but it may require further labor. Instead of soft wire, think about utilizing 10-gauge high-tensile wire for the anchor.
PVC tubing should be placed over the wire around the anchor to increase visibility to orchard workers and lower the possibility of equipment damage.
End Poles
The normal end pole has a thin end diameter of 4 to 5 inches and is made of treated lodgepole pine. Poles constructed of rib-back steel, which have holes every two inches where the wires can be secured, can be used in organic orchards as an alternative to treated wood. They are strong enough to withstand lengthy runs and intensive cropping and weigh 3 to 4 pounds per foot. Well-drilling pipe, which is available in a variety of lengths, is another non-wood choice. Since it lacks holes, the grower must weld attachment places.
Line post
For the purpose of raising higher trees with more bearing area, 14-foot poles have become more popular. Steel poles that are appropriate for organic farming have notches where the wires may be readily inserted, which lowers the cost of installation. Metal works well for V- and A-trellis structures.
Although the rootstock, row length, tree height, and soil quality all affect pole spacing, it is advised that line poles be spaced no more than 40 feet apart. Even while the trellis initially costs more due to closer spacings, it is less expensive to build it correctly than it is to repair a collapsed trellis.
Line wires
Line wires are typically made of Class 3 galvanized steel, 12.5-gauge, with a minimum tensile strength of 180,000 pounds per square inch and a breaking strength of 1,380 pounds.
To support a crop without sagging, the lines should be tightened to a tension of 200 to 250 pounds per square inch (p.s.i.). Remember that if the trellis is constructed in sweltering summer heat, the wire’s tension will be substantially higher when it compresses in the winter. If the wires become slack after installation, a wheel tightener can be used to tighten them.
More staples could be needed in the top posts of the row if it crosses a hill since the wires are attempting to drag themselves down. For additional reinforcement in any line or end post, use three- or four-inch spike nails. Another anchor may be required at the foot of the dip since the wires are trying to draw up when the row passes through a valley.
Wooden posts have a surface protective treatment, and the fewer penetrations through that surface treatment, the longer the post will last.
The trellis should be built to last the whole life of the orchard, or even longer if a new variety is grafted in.
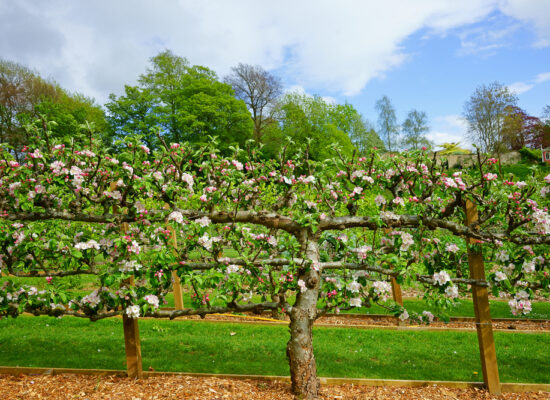
Fruit Tree Espalier Techniques
The key to mastering the art of espalier is to prune and train your plants with care and precision. Learn how to espalier fruit plants by following these instructions.
How Espalier Got Its Start
The practice of espalier, or training a tree or shrub to grow flat against a support and resemble a living sculpture, dates back to ancient horticultural practices. Originally planted in internal courtyard walls to avoid late frost bud-kill, espalier was also employed to construct outdoor “walls” throughout Europe during the Middle Ages. The trellis or framework used to support the tree was originally referred to as a “espalier” in French. The following are only a few advantages:
- A beautiful display of garden artistry that will have your neighbors raving about your homegrown fruit includes
- A small area that is very easy to pick from without a ladder;
- Homegrown fruit
Which fruit trees grow best in an espalier?
The standard options are apples and pears. Apple trees are a little simpler since their young stems are a little more forgiving when you try to bend them toward your support wires because they don’t harden as rapidly as pear trees. Pomegranates and peaches espalier beautifully as well. As long as the fruit tree is suitable for your climate, you can try your hand at espaliering it. However, for tiny spaces, dwarf or semi-dwarf trees work best. Given that apple trees are a popular espalier selection, take notice that spur-bearing apple trees are even better if you want your living fence to produce more fruit.
The Best Places to Plant Espaliered Trees
Location is crucial. You will require around 8 feet of straight area in a well-drained location with direct sunlight. The tree will have at least six hours of light each day if it is in full sun. Espaliered trees can be grown in the following locations:
- Against a wall (often made of brick or stucco);
- Along a fence, trellis, or pergola
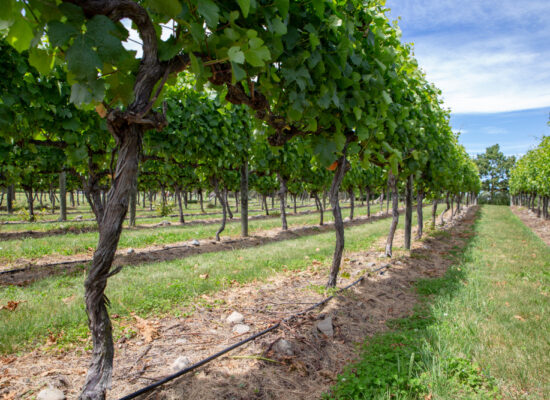
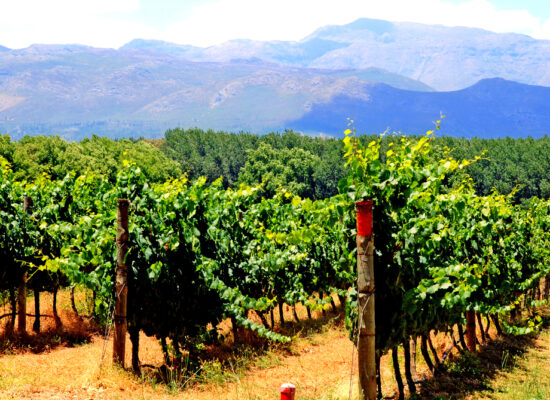
- Along a row of strong, free-standing poles and wires (as many wine grapes are grown)
How to Prune Your Espaliered Fruit Tree and When to Do It
To keep the tree in shape, you might need to prune it twice or three times per season. After it blooms in the spring, the first pruning should be performed. You can prune appropriately based on the blossoms, which will show you where the fruit will be. (To avoid the spread of disease, always use very sharp, clean shears that have been rinsed and dried after each use, properly cleaned with an alcohol wipe, or both.) You may start to see fruit as early as the second year, but if you want the most out of your espaliered tree, remove that developing fruit for a year or two. It typically takes around four years to see the full artistic result of your work. After that, keep a watch on it and prune any vertical shoots, suckers, and water sprouts. Reduce the horizontal branches’ length to promote the growth of a fruiting spur. You will eventually have many fruits setting on your espaliered tree because more fruiting spurs will be formed along the horizontal branches than the vertical stem, so make sure your support is robust.
Feeding And Watering Esplanade Trees
Until it becomes established, the young tree need the equivalent of around a gallon of water every seven to ten days. You don’t need to offer any additional water if you find that rain is keeping your tree hydrated. You can apply a specially prepared fertilizer for fruit trees as necessary during the growing season, much like with a fruit tree growing organically. In order to avoid burning the young tree roots, adhere to the instructions on the packaging. Learn how to fertilize effectively here. Your fruit garden will stand out from the ordinary as a result of your perseverance, patience, and attention to detail. In addition to a wonderful fruit yield, you’ll also get a fairly magnificent living sculpture!


© Arbemu. All rights reserved